
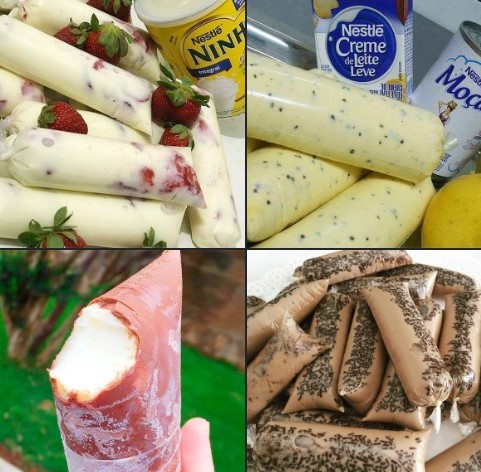
Ice cream is one of the world’s most loved and cooling desserts. Whether on a hot summer day or just as a treat after a meal, good ice cream can turn any moment into a sweet memory. Homemade creamy milk ice cream, with its soft, rich, and well-balanced texture, is one of those timeless classics that never go out of style. Unlike store-bought ones, homemade milk ice cream is much more natural, letting you enjoy pure flavor without additives or preservatives.
What makes this ice cream stand out is its creaminess, which comes from the mix of milk, sugar, and cream, giving it a velvety texture that melts smoothly in your mouth. Plus, the recipe is fairly simple, so you can make it at home, with or without an ice cream maker. This treat is perfect for lovers of classic flavors who want an easy dessert using ingredients you likely already have in your kitchen.
In this guide, we’ll show you how to make creamy milk ice cream step by step, what ingredients you’ll need, and some ideas to customize it to your taste.
1. Why Choose Creamy Milk Ice Cream?
Creamy milk ice cream is one of the most flexible and tasty choices for frozen treats. Its gentle flavor and soft texture make it the perfect partner for fruits, cookies, syrups, and more. Since it’s a homemade ice cream, you also have full control over the ingredients, making it easy to adapt to your preferences and dietary needs.
One of the main appeals of this ice cream is its rich creaminess, thanks to the use of milk and cream. While industrial ice creams are often more airy and less dense due to added air (called “overrun”), homemade ice cream tends to have a fuller and more luxurious mouthfeel. You also avoid artificial colors, flavors, or chemicals.
This ice cream is also very easy to make at home, even without an ice cream machine. With the right ingredients and a bit of patience, you can get a creamy and tasty dessert right in your own kitchen. If you have kids, this can be a fun activity to enjoy together, as they can take part in every step of the process.
2. Ingredients for Creamy Milk Ice Cream
The ingredients for creamy milk ice cream are basic and easy to find. You’ll only need a few simple items that you probably already have in your pantry. Here’s what you’ll need:
Ingredients:
- 500 ml whole milk (whole milk gives it creaminess, but you can also use semi-skimmed)
- 250 ml heavy cream (at least 35% fat; the cream gives it that rich texture)
- 150 g sugar (you can adjust based on your taste or use natural sweeteners like honey or stevia)
- 1 tsp vanilla extract (for aroma and flavor)
- 3 egg yolks (optional, but they add extra creaminess)
- 1 pinch of salt (to balance the flavors)
- 1 tsp corn syrup or glucose (optional; helps prevent ice crystals)
Optional Add-ins:
- Fruit bits (like strawberries, banana, or peach) or nuts (like walnuts or almonds)
- Chocolate chips or grated coconut
- Fruit jam or syrup
- Liqueur (like rum or orange liqueur) for a special kick
- Crushed or caramelized cookies for crunch
3. How to Make Creamy Milk Ice Cream
Making homemade milk ice cream is easier than it looks, even without an ice cream machine. The key is following the steps well so the mix freezes evenly and stays creamy. Here’s the step-by-step process:
Step 1: Prepare the base mix
Start by heating the milk in a pot over medium heat, but don’t let it boil. While it warms, beat the egg yolks in a bowl with the sugar and a pinch of salt until smooth and thick. If you prefer a version without eggs, you can skip this step.
Step 2: Temper the eggs (if using eggs)
Once the milk is hot, slowly add a bit of it to the egg mixture, stirring constantly to temper the yolks. This helps prevent them from cooking too quickly. Gradually add more milk while whisking until the mixture is fully tempered.
Step 3: Cook the mix
Pour the egg and milk mixture back into the pot with the rest of the hot milk. Cook on low to medium heat, stirring often, until it thickens slightly. You’ll know it’s ready when it coats the back of a spoon and leaves a clear line when you run your finger across.
Step 4: Add cream and vanilla
Once thickened, remove from heat. Add the cream and vanilla extract. Stir well to combine. If you’re using corn syrup or glucose, now’s the time to add it—it helps reduce ice crystals.
Step 5: Chill the mix
Let the mixture cool fully at room temp, then chill it in the fridge for at least 2 hours, or until very cold. This step is key because a properly chilled base freezes better and becomes creamier.
Step 6: Freeze the ice cream
If using an ice cream maker, pour the chilled mix into it and follow the machine’s instructions. If not, pour the mix into a freezer-safe container and freeze for 3–4 hours. Every 30 minutes, stir the mix with a fork to break up ice crystals and help the texture stay creamy. Repeat until frozen.
Step 7: Serve and enjoy
Once fully frozen and creamy, it’s ready to serve! You can eat it plain or top it with fresh fruit, syrup, cookie bits, or anything else you like. Homemade milk ice cream keeps well in the freezer for several days, but for best freshness, eat it within two weeks.
4. Variations and Tips to Personalize Your Creamy Ice Cream
Creamy milk ice cream is a great base for many variations. Here are a few ideas to make it your own:
- Fruit Ice Cream: Add puréed fresh fruit (like berries, mango, or banana) to the base mix. Strain the fruit to remove seeds or chunks for a smoother texture.
- Chocolate Ice Cream: Mix in cocoa powder or melted chocolate. You can also stir in chocolate chips for added fun.
- Cookie Ice Cream: Add crushed cookies like Oreos, chocolate chips, or any favorite biscuit for a crunchy twist.
- Coffee or Vanilla Boost: Add instant coffee or extra vanilla to give it a bolder flavor.
- Dairy-Free Option: Swap milk and cream for plant-based alternatives like almond, soy, or oat milk. Use a plant-based cream too for a fully dairy-free version.